
I feel so honored to be a part of what the Lord is doing for orphans through a dear family at our church. They are getting ready to make the journey to China to pick up their TWO precious babies! To see their story, follow their blog here.
In preparation for their journey, the ladies at our church will be making Hope Blankets for them to take to China. People will be able to sponsor a blanket and pray over them. The funds raised from the sponsorship will go directly to providing formula and diapers to the orphans there. What an amazing way to bless some babies!
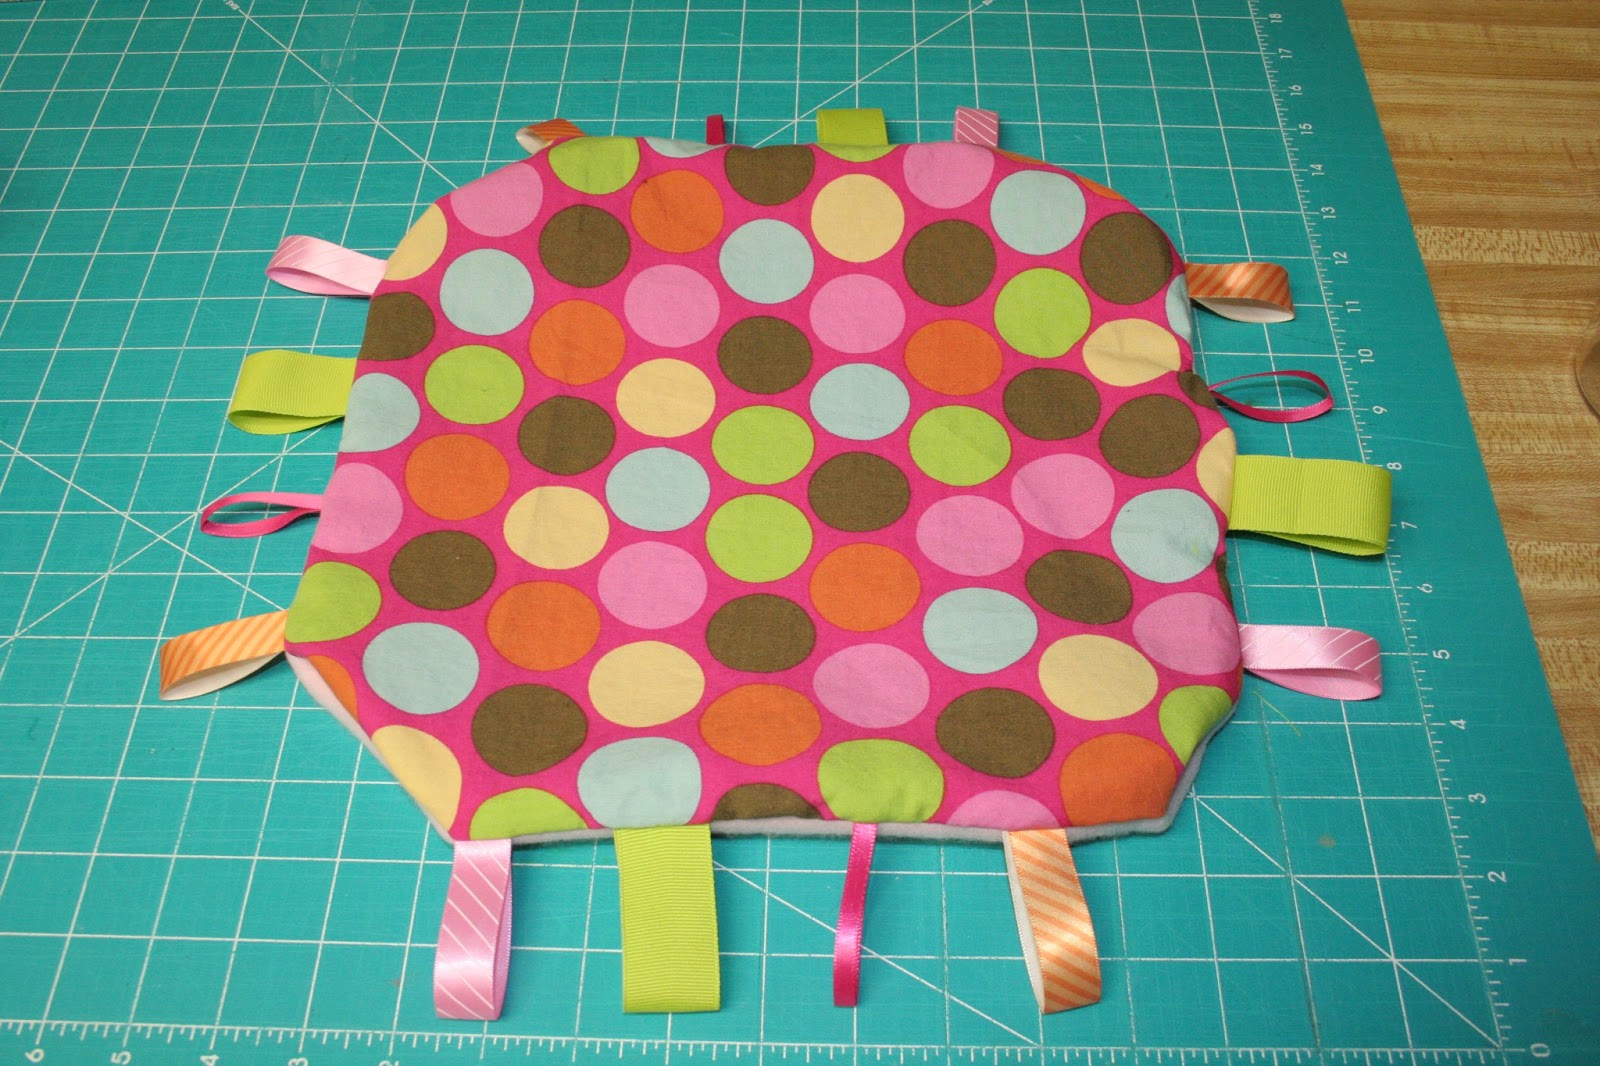
Below is a step-by-step tutorial for the Taggie Lovey blankets we will be making. The tutorial is designed for a beginning sewer so it should be pretty easy to follow. You can also download a pdf copy here. Let me know if you have any questions!
Materials:

·
13"
x 13" Square of Solid color fabric
·
13"
x 13" Square of printed fabric
·
4
contrasting & complementary ribbons (20" of each)
·
Sewing
machine
·
pins
·
needles
·
scissors
·
a
pencil, chop stick, or pen for turning the corners
·
ruler/measuring
tape
·
iron/ironing
board
Recommended Fabrics:
solid
color soft or textured fabric like fleece, minky, velvet, corduroy etc.
colorful,
bright, fun printed cotton fabric
Cutting and Preparing:
Cutting the fabric
First,
make sure the cotton print is pressed and neat. This will make it easier to
cut and work with.
|
 |
Align
one corner of the fabric with a straight edge and trim the edges to even them
out if needed.
|
 |
Measure
a 13" x 13" square and cut the length and width
|
 |
Repeat
the above steps for cutting the solid color, textured fabric. (do NOT press
the textured fabric)
|
 |
Cutting the Ribbons
A
quick way to cut the ribbon is to stack them all up together.
Measure
5" lengths and cut with scissors or rotary cutter.
Cut
four 5" lengths of each of your four ribbons.
|
  |
Pinning the Ribbons:
On
the RIGHT side of the PRINTED fabric square, space out your four ribbons
evenly starting and ending 3" from the corners.
|
  |
Fold
your ribbons in half, RIGHT sides out, and pin to the RIGHT side of the
PRINTED fabric square.
Make
sure the cut edges of the ribbon are even with the cut edges of the fabric.
Pin
with the sharp point of the pins facing outward (this keeps the large part
from interfering with the presser foot of the machine in later steps).
|
  |
Sewing the Blanket:
Securing the Ribbons
Starting on one corner, use a regular straight stitch
around one edge of the fabric about 1/4″ from the edge to secure the ribbons.
|
  |
When you get 1/4" from the first corner, leave your
needle in the downward position and raise your presser foot.
|
  |
Rotate the fabric, lower the presser foot, and continue
along the next side
|
   |
repeat the steps above until you have completed all four
sides
|
 |
Remove
pins and trim threads
|
 |
Pinning it all Together
Lay
your second piece of fabric on top of the piece with the ribbons.
Make
sure the RIGHT sides are TOGETHER, so that the ribbons are sandwiched in
between.
|
 |
Pin
the two pieces together around the edges with the sharp points of the pins
facing out. (The more pins the better on
this step to keep that pesky fabric from moving around too much as you sew).
|
 |
In
the middle of one side, leave about a 3" gap between the pins.
This
will act as your guide for where you leave the hole for turning later.
|
 |
Sewing the two Together
Use a 1/2" seam and start in the MIDDLE (to the outside
of the SECOND pin in the 3" gap).
|
  |
Using a straight stitch, sew forward two or three
stitches then back stitch 2 or three stitches to secure the seam
|
 |
Continue
sewing all the way to the first corner until you are 1/2" from the edge
|
 |
As
you did when sewing the ribbons, leave your needle in a downward position and
raise your presser foot.
|
 |
Rotate the fabric and continue along the next side.
|
  |
Repeat the steps above until you get about 3" from
the start of your seam.
|
 |
Back stitch and forward stitch a couple of stitches to
secure the end of the seam.
|
|
Remove your pins and trim your threads.
|
 |
Turning the Blanket
Cut the four corners of the blanket close to the
stitching to make the points less bulky when it is turned.
|
 |
Turn the entire blanket right side out through the hole
left when sewing.
|
 |
Using a pencil, chopstick, or pen with cap, carefully
push out the corners of the blanket from the inside until they are nice and
square.
|
 |
Flatten out the blanket and finger press
the edges.
|
 |
Line up the area where you left the opening
for turning and pin it generously.
|
   |
Finishing the Blanket
(If
you want your thread that is seen to match, now is the time to change your top
thread or your bobbin thread)
With
1/4" seam, start at one corner and top stitch (sew a straight stitch across
the top edge of the fabric).
Begin
with a forward and back stitch to secure the seam.
|
 |
Be
sure that the 3" opening is sewn securely when you reach that point
(edges are pinned nicely and not coming out).
|
 |
Pivot
at each corner as you did in previous steps.
|
   |
Continue
until you reach the corner where you started.
|
 |
Forward
and backstitch to secure the seam.
|
|
Trim
the threads, remove the pins and you are done!
|
  |
Some other helpful Links to Get to Know your
Machine and Sewing Terminology